-
Getting Started
- Articles coming soon
-
FAQs
-
Release Notes
-
Dashboard
-
Sales
-
Bookings
-
- Articles coming soon
-
- Articles coming soon
-
- Articles coming soon
-
Finance
-
Productions
-
Customers
-
- Articles coming soon
-
- Articles coming soon
-
- Articles coming soon
-
- Articles coming soon
-
Settings
-
- Articles coming soon
-
- Articles coming soon
-
This page guides you through the entire process of creating a new booking.
A booking can be created by clicking on the 'Add Booking' button of any release on the Dashboard- 
Or on the ![]() button on the Bookings tab.
button on the Bookings tab.
From there the Add Booking pop-up will show.
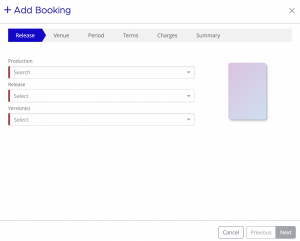
This process has 6 steps.
- Release and version selections.
- Venue selection
- Start & end date and shipping selection
- Setting the terms
- Adding additional charges (only applies with certain settings, see Additional charges)
Release
First, search for a Production by adding the first few letters in the search box
Then, if you have multiple releases select the relevant one
Finally, add or remove
any version(s) based on what you wish to ship as part of this booking![]()
Note: When clicking on 'Add Booking' via the Dashboard, these fields will be pre-populated for you.
When you're happy, click 'Next'
Venue
Once you've selected a release, you can add one or more venues.
You will only be able to select venues in the country of the release you selected.
It is possible to select multiple venues. This will lead to multiple bookings, but other settings will all be the same over all bookings made at the same time.
Use the Venue search to find the venue(s) you wish to book for. The search will also return any Venue Groups you have previously created. You can also create a new venue group from the current selection by clicking the Floppy Disk icon 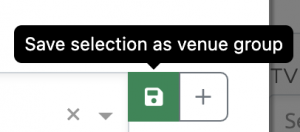
Next to that icon is a + button that leads you to the Add Venue pop-up. this lets you add a new venue without leaving the booking window.
Single venue
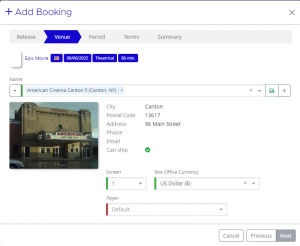
Selecting a single venue Will show the details of the venue:
- An image of the venue
- The address
- Whether shipping DCPs and KDMs is available for this venue or not.
- When you already have a booking for this release and venue, it will show the already booked period
Underneath you can specify the screen you wish to book on.
Next to it you can set a different box office currency. The default is the standard currency of the country the venue is on.
Underneath you can set the payer. If you have a payer connected to the venue it will be set here by default, but can be changed.
You can continue without a payer, but it will need to be set in the booking before you can invoice.
Multiple venues
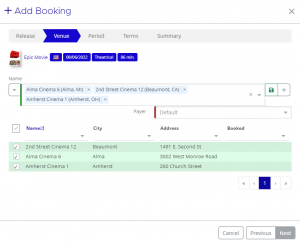 Selecting multiple venues will change this step a bit.
If you select a venue group or more than one individual venue, a list will be shown with all your selected venues.
This list will display the name of the venue, its city and address, for what period bookings of this release and venue already exist.
If at least one of the venues does not allow the shipping of DCPs and KDMs an extra column will be added to the list indicating which of the venues can have shippings and which cannot.
Above the list you can add the payer.
Based on the information provided you may wish to remove some venues from the selection. You can uncheck some entries from the list. They will no longer be in green and will not be booked when you continue.
Once you've selected the venue(s) you want, you can click next
Period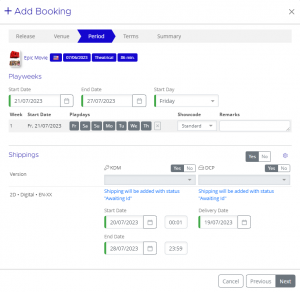
Playweeks
Here you set when the release is to be shown in the selected venue(s).
You first set a start and end date. The default is the nearest coming start day of a playweek in the selected country, running for 1 week.
You can set any day you wish, but it will be displayed in playweeks.
If you have a booking from Tuesday to Monday, but the start of a playweek is on Friday, it will be booked as 2 playweeks.
However, it is possible to change the start day per booking, using the dropdown next to the end date.
For each playweek you can set a showcode. These can be used to indicate special showings, like Sneak Previews, Festivals, Private Showings or others.
Shipping
In this section you can set the delivery details of DCP and/or KDM shippings.![]()
At the top right of this section you can switch shippings off entirely. The dark grey background indicates the selected setting. Clicking no removes the rest of the shipping sections entirely.
Below it you can turn KDMs or DCP's off seperately, in case you work with unencrypted DCPs.
When shippings are active, each version in the booking will be shown with the selected depot and the shipping ID..
When there is a kdm/dcp in the release, but it does not have an ID yet, you will see this text in the booking

Bookings that are created like this will have the Awaiting ID shipping status that will be automatically filled in when you add a shipping ID to the shipping details in the release.
In the Add Booking window, below the shippinng IDs, you can set the start and end date of the KDM and the delivery date of the DCP. You cannot continue if these dates are set in the past.
Once all details in the period tab are ceoorect, you can click next.
Terms
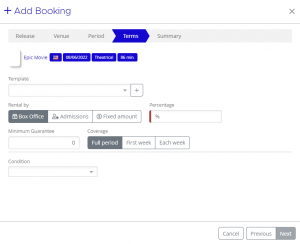 In the next tab you can set the terms.
Rental types
You can set your rental in one of three ways:
- Boxoffice: Take a percentage of the generated revenue.
- Admissions: Charge a specific amount for each visitor, regardless of ticket price
- Fixed amount: Charge one set amount for the entire booking
Minimum Guarantee
With the first 2 types you can choose to set a Minimum guarantee.
A minimum guarantee is an amount that will be paid in rental even if the boxoffice or admissions are not high enough to cover it.
You can set an minimal guarantee in three ways.
- Full Period: The minimal guarantee will only be charged in the final invoice of the booking, and adds the remaining amount if the combined rental in the booking does not exceed the minimum guarantee.
- First week: Only the first week is subjected to a minimal amount in rental.
- Each week: Each singel week must reach the set amount or an additional charge is added so total rental will match the minimum guarantee.
Conditions
For rental by boxoffice or admission you can set one percentage, or amount per visitor, next to the selection of rental type.
These are the default values. But you can also add conditions.
You can set one of three types of conditions:
- Playweek:
- Estimated Box Office:
- Occupancy Rate(%):
Templates
Charges
Summary

